Operation means
1.
Install the motion-controlling card and driving software
a) Insert
the motion-controlling card into the PCI slot on the main board of the
computer.
b) Setup
the driving software

2.
Start laser
a)
Make sure the cooling water circulation pipes of laser tube is
correctly connected without any leak.
b)
Insert the power plug of laser tube’s cooling water circulation
pump to the output power socket at the back of engraving machine.
c)
Ensure the circulation pipes are filled with cooling water.
d)
Ensure the cooling water in the circulation pipes can circulated
smoothly.
e)
Ensure the blowing system is connected correctly. Insert the
power plug of the gas compressor to the output power socket at the back
of engraving machine.
f)
Connect outer power supply with exhaust fan and turn it on.
g)
Turn on the main power supply.
h)
Turn on the laser power supply
3.
Turn on the engraving machine’s driver system
a)
Ensure the connection between the engraving machine and the
computer is correct.
b)
Ensure there is nothing to block the laser head of the engraving
machine and other move parts.
c)
Ensure there is no impediment on the engraving machine’s light
way.
d)
Ensure the light way of engraving machine is on the right way and
with no deflection.
e)
Turn on power of the engraving machine’s driver system.
f)
Turn on the computer power.
Caution:
The laser the machine used is high-energy invisible light. It’s harmful
for human health and can get burn combustible easily! Before making sure
the light way is correct, don’t turn on the power of the driver. In the
case the machine is turned on, turning the power of the driver on may
inspire the laser!
4.
Laser focus adjustment and setting means of two kinds of
focalizing lens
a)
There must be a material which as thick as work-piece on the
working table under the focus lens.
b)
The focus point is about 10mm under the laser head. (The
convexity of the focalizing lens should be installed upside.)
c)
Through adjusting laser focus head and pillow work-piece, place
the surface of work-piece on the focus exactly.
d)
Press the laser light-testing button. There will appear a laser
light and boil away a point on the work-piece underneath which is
watering for engraving.
e)
Through adjust easel of focus lens to find out the focus place
which most centralized of laser power and where appear the minimum
burning point on the material surface. The point is the place where is
the best focus. You’d better move the focus lens and try more times on
different places of experiment material surface. (left-up, left-down,
right-up, right-down, center.)
f)
If the thickness of the work- piece is out of the adjusting range
of the focus lens easel, the work-piece should be taken out of the grid
worktable.
g)
CHAOSTEC series of products supply the easel for lens whose focus
is 50mm/100mm. For the lens whose focus is 50mm, undo the cone-shaped
spiracle at the bottom of the easel and install the lens above spiracle
(the larger part). For the lens whose focus is 100mm, undo the
cone-shaped spiracle at the bottom of the easel, remove the lens whose
focus is 50mm, pull out the sleeve (the long lens socket) inside the
gliding column, put the lens on the top of the sleeve, lay back the
sleeve with the lens inside the gilding column and finally screw up the
cone-shaped spiracle.
The setting means of focus
lens
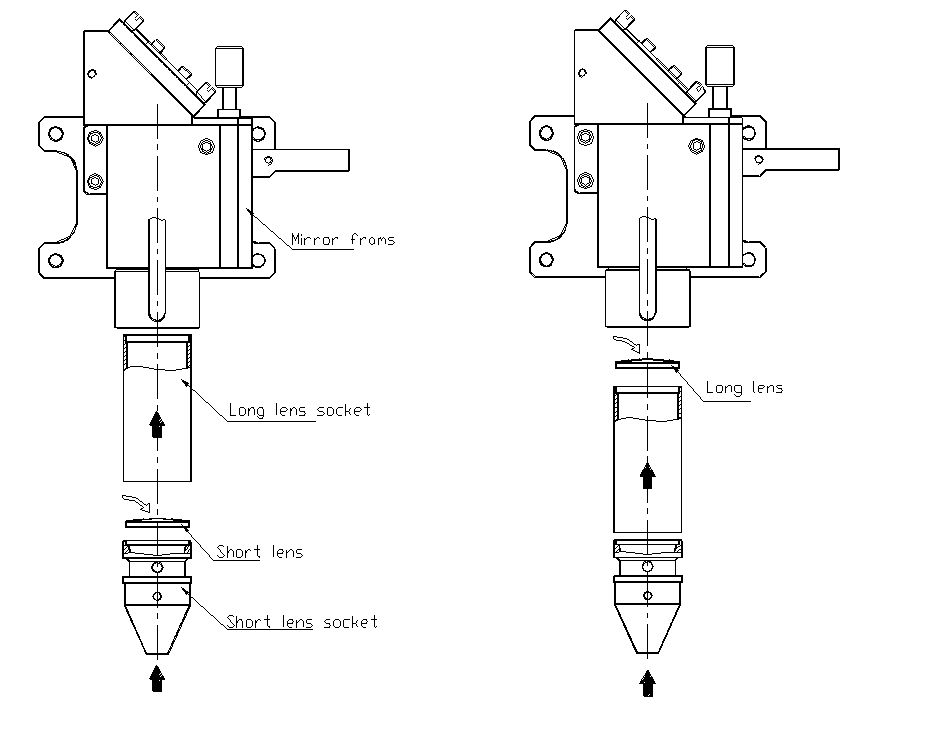
The setting means of short
focus lens
a)
Make sure the long focus have not been installed at the long focus
lens socket.
b)
Install the short focus lens into the short focus lens socket.
c)
Install the short focus lens cohere with the lower end of the long
focus lens socket into the mirror frame. After the outside screw thread
connected with the inside screw thread, circumrotate the screw thread.
The setting means of long
focus lens
a)
Make sure that short focus lens have not been installed at the
short focus lens socket.
b)
Install the long focus lens into the long focus lens socket.
c)
Install the short focus lens cohere with the lower end of the long
focus lens socket into the mirror frame. After the outside screw thread
connected with the inside screw thread, circumrotate the screw thread.
Note:
the short lens (f=50)
is suitable for
scanning, engraving and cutting thin material (< 8mm);
the long lens (f=100)
is suitable for thick material.
5.
Introduction of the machine original orientation and the engrave range
The default origin is at left-up corner. You can know
the correct work-piece location by the software’s function of location. It
can also be known by moving the laser focus head with the direction
button on the control panel.
6.
Manual of the button in the control panel
a)
Reset
button
Press the reset button, the machine returns to
the origin and resumes all defaults.
b)
Four arrow buttons
Only press an arrow button, the laser carriage
moves by the direction.
c)
Pause
button
Press pause button, the machine will stop in its
current mode. Press it again, and the machine continues to work.
d)
Enter
button
Press enter button when the design of engraving/
cutting content is completed and the parameters are set, and then the
machine began to work.
7. LED
display
Figures displayed on LED on the control panel are the
electric current of the laser driver power. Its unit is mA. It reflects
the strength of the power of the laser.
8. Tips
for turning on and off the machine
a)
Steps for turning on the machine
First turn on the main power supply, and then come to
the power of the driver, and finally that of the laser.
b)
Steps for turning off the machine
First turn off the power of the laser, and then come to
the power of the driver, and finally the main power supply.
Applicable Software
Chaostec Series of Laser Engraving Machine are
compatible with the graph software based on HPGL instructions, for
example, AUTOCAD, CORELDRAW, etc.
Note:
Just click region button once to
edit skeleton pictures created by AUTOCAD, which is helpful for taxis.
Installment of the Motion Controlling Card & Some
Explanations
1.
Insert the Motion Controlling Card into the PCI slot on the
computer main board. Fix it by bolts and make sure the juncture between
the card and the PCI slot reliable.
2.
Turn on the computer power and put the
driving disk of the card matched with the laser machine into the CD-ROM.
After the card is automatically tested by the computer, search for the
driver of the card from CD-ROM in the Windows system and confirm the
instruction.
If the computer doesn’t test the card, take out the
disk, shut the computer and start the operation above again.
If the controlling software is started and reminds that
the card hasn’t been installed, please shut the computer, screen the Sound
Blaster Card and some other cards in the computer and install the Motion
Controlling Card again.
Installment
of the Soft Dog
Insert
the soft dog into the serial port at the back of the computer and turn on
the computer. After the computer tests the soft dog automatically, start
the driving system of the soft dog.
Basic operation on the
control panel
1. The
operation on the control panel is available only when out selected in the parameter set of
the software. You can also move Y dimension pulley by the up/ down/
left/ right button on the control panel.
2. Figures
displayed on LED on the control panel are the electric current of the
laser driver power. Its unit is mA. It reflects the strength of the power
of the laser.
Safety
measures and maintenance
1.
Laser power is high voltage equipment, disassembled arbitrarily is
forbidden. Do not break the electric and magnetic shield and take care of
the aeration and cooling.
2.
The cable connected with laser power
and outlet must be earth reliably.
3.
Cooling water in laser tube should be clean and replaced regularly,
the water must be under good circulation, in which it can release heat
easily.
4.
Before turn on the laser power, make
sure the cooling water can circulate well.
5.
When air temperature is too low in
winter, the water in the laser tube must be drained out after shut laser
machine to avoid icing.
6.
The cable connected with the power of
the driving system must be earth reliably.
7.
Don’t open the hatch when the machine
is working or the laser power is on.
8.
Stand off combustible and easy
explosive matter.
9.
Use the equipment in clean
environment surrounding. Surrounding temperature :0?0 C; comparative
humidity: 10-75%
10.
The rail and wheel of the move part
of machine should be kept clean. The column rail should be protected by
wiping with lube after it is cleaned regularly. The linear rail should be
protected by lubricant. The lubricating nipple of moving unit should be
poured lubricant regularly.
11.
The smoke discharging system and the
aeration system must be kept free. The smoke discharging system and the
aeration system must be turned on before turning on the laser machine.
Caution:
During the machine is working, there must be some keeper to take charge of
it!
Familiar
trouble shooting
1.
Focus laser head can’t radiate light
a.)
Laser head can’t radiate light:
1)
Laser power was not turned on. Turn on the laser power supply.
2)
Some problem occurs in the junction between laser tube and laser
power: connect it well.
3)
The laser tube damaged because of aging: replace a new one.
4)
The laser power supply damaged: replace a new power supply. There
is no signal for laser radiation from the control system:
5)
Examine the connection between the control system and the power of
laser, and check the control system.
b.)
Deflection of light way lens/ mirrors: reset light way.
c.)
Cutting or engraving depth is not enough.
1)
The setting of laser power export is too low: set the laser power
output to a higher level in the software.
2)
Cutting /engraving speed is too high: set the speed to a lower
level in the software.
3)
Reflex mirrors and focus lens in the light way have polluted or the
plating reflex membrane of the mirrors surface and clarity increasing
membrane of the lens surface damaged: clean the lens/ mirrors or change a
new lens/mirrors.
4)
The focus of lens is not in correct place: reset focus point.
5)
Aging problem of laser tube: increase laser power setting value or
change laser tube.
6)
Output electric current not powerful enough: adjust the power
supply or change to another one.
d.)
After the computer output typesetting, the machine can’t move.
1)
The power supply of driven system of engraving machine wan not
turned on: turn the power on.
2)
The communicate cable between computer an engraving machine is not
connected well: turn off main power switch and connect them well.
3)
The motion control card or the soft dog is not well installed.
e.)
There are redundant threads in engraving or cutting course.
1)
There are some problems with communication cable: Please change
communication cable.
2)
Engraving machine and computer are not earthed well: let the
machine and computer earthed reliably.
3)
There are creep age or the clutter in the computer power supply:
change or maintain the computer power supply.
4)
Computer system error: Reinstall computer operation system or
change another computer.
5)
There are too many temporary files in the computer: clear the
computer system in time and delete the temporary files.
6)
Application software error: reinstall application software and
setup the driven software.
7)
If using the machine in moisture surrounding and lots of dust
accumulating on the machine case, communication cable or the inside
connection line will make the power discharge disturb: clean and warm-up
the machine before use it.
8)
Unsteadiness of outer power caused by power disturbance: choose an
more pure power supply.
9)
There are high frequency disturb source around the machine: keep
away with the high frequency disturb source.
f.)
The output is rejected, there are something discord locally, or
file is missed partly.
1)
The design exceeds the range: check the range of the design, then
reduce the design range to the appropriate range.
2)
The file size is too large: reduce the setting definition, or
increase the scanning step distance, or to scan (engraving function)
without pre-accelerate.
Caution: if there is any problem, the problems must be
managed under the direction of professional person form dealer or
producer, or managed by professional persons from dealer or producer
themselves.
Installment of the Software &
Basic Operation of the Software
After the Motion Controlling Card and the Soft Dog are
installed, unfold the explorer in windows system,
start the software of the Motion Controlling Card in the disk and setup
it.
Laser
Marking System V2004
I. System
Disposing
1.Run above CPU486, RAM 32M.
2.VGA display.
3.One 3.5?Floppy Drive,one
CD Driver,at
least 1G Hard Disk。
4.Window95/98/NT operational system.
II. System
Installation
1. Hardware
Installation
Turn off the computer power, and insert the softdog
into LPT terminal.
2. Software
Installation
Run SETUP installation program on the CD directly, and
then operate according to the guide on the display. After finishing the
installation, LASERMARK swift icon will be produced. In order to make the
best result of showing, propose setting the tabletop of the screen into
800*600 resolution and little style fonts.
After finishing the installation of the CD, please copy
the character library file from special-purpose figure and script
catalogue to installation catalogue.
III. To
start system
Dblclick LASERMARK icon in the Windows system and then
enter into program interface.
IV. System
Maintenance and Upgrading.
The buyer could contact developer at any time to get
the newest upgrading information of software.
V.
Software Operation
A.
Software Interface
The above
picture is the software interface, it is mainly composed of Menu, Toolbar,
Editing Area, Status bar, List Frame, Property Page, etc.
B. Menu
The menu is including Files, Graphics, Edit,
Options, Help.
There are NEW, OPEN, SAVE etc. subsidiary function
menus when drawing up the file operation menu; In addition, there is every
function option related to print.
There is each sub function menu of basic element of
picture forming when tagging the picture designing menu.
The editing menu is including three sub function
menu (cut, copy, paste).
The three above-mentioned sub function menus are
all have corresponding swift keys in Toolbar: among them Graphics menu is
corresponding to the Toolbar on the left side; the File menu and Edit menu
are corresponding to the top horizontal Toolbar.
When tagging the Options menu, there are tool bar,
Status Bar, delete sub function menu. These sub function menu is used to
display or hind tool Bar, Status Bar, and editing area respectively. When
the sub function menu with a hoop means that is in the state of
displaying.
The Help menu is used to point out version of the
software.
C. Status
Bar
The State Bar at the bottom of the interface is
mainly used to showing the current operation or state.
While mouse cursor move on each sub function menu or
the swift button of Toolbar, the left side of the Status Bar will appear
character direction in order to providing the concrete function of each
menu or the button clicked.
While mouse cursor placing in the editing area, the
Horizontal and Vertical coordinates will be appear at the middle parts of
the Status Bar for showing the current position of the mouse cursor.
There is current marking time and amount marking number
showing on the Status Bar.
In addition, there is Current Step distance display at
the right side of the Status Bar.
D. List
Frame
Each item in the List Frame shows the image elements
that have already produced in the editing area.
The content
in the List Frame will change along with the change of the image elements
in the editing area, as above picture shows: a circle image element, a
rectangle image element, two lines of text appears in the Editing Area.
The List Frame shows Line_text1, Line_text2, Rectangle1, Circle1
correspondingly. The figure at the end of list item in the List Frame is
used to distinguish different image elements in same type.
To
choose the current image element by using mouse click list item. As above
picture shows, when click Circle1 item, the current editing image is the
circle on the lower right side.
When
there is none image element or select nothing of image element, the
current list item is Parameter Setting Option on the top of the List
Frame. Parameter Setting Option is interrelates with the systematic
parameter.
It can
change the marking order through UP and DOWN button.
E.
Property
Page
The
Property Page is used for modification current image element or systematic
parameter. The Property Page area could offer corresponding 1?/span>3
Property Pages to each different state in editing area. It can change
different Property page by click the different header.
Each Property Page has different editing frame, button
etc. in order to realize the parameter setting or modification. Its
concrete function will be introduced in detail in the follow-up chapter.
This chapter will introduce the parameter setting property page.
Page one of this Property Frame is the parameter
setting, as the picture showing as above, it is mainly used for systematic
parameter setting. In the upper part of this page have 12 editing frames
and its corresponding fine setting button use for setting the parameter.
The step distance shows in the right ends of Status
Bar, could increase and reduce step distance through two small buttons.
Every corresponding item in the Property Page is
explained as follows:
1.Edit size: the size of the editing area , regard mm.
as the unit.
2.Grid Size:It
is the size of grid in the editing area, regard mm. as the unit.
3.Scale X:The
horizontal proportion between the actually image size of output and the
image size of editing, the default value is 1. 0.
4.Scale Y:The
vertical proportion between the actually image size of output and the
image size of editing, the default value is 1. 0.
5.X
Y Exchange:Exchange
X, Y axle while output;
-X:Reverse
X axle when output;
-Y:Reverse
Y axle when output;
6.
Home After Marking:It
is used for laser pen going to the home point after finishing the laser
marking.
7.
Home X、Y:It
is used for setting the home point.
Corresponding single button could set 8 different color
layers from black color to white color, thus this function could realize
laser stratification output according to different color editing layer.
1.Mark
Num:It
is the output repetition number of times of a certain color layer.
2.
Laser Power:The
output power range of the laser marking machine is 1?/span>100.
3.Cut
Speed:The
cut speed range of the laser marking machine is 1?/span>200mm/s.
4.Carve
Speed:The
carve speed range of the laser marking machine is 1?/span>1000mm/s.
5.Clearance compensation:When
using scanning output or carving style,the
speed is very high,the
laser may not turn on in time. We use this parameter to compensate the
slip.
6.Accelerating Length:When
using scanning output or carving style,the
laser pen need an
accelerating length to reach a high carve speed.
7.Combine scanning output:Check
the option to choose carve style.
When clicking Scanning Area layer on the top of
Property Frame, the following Property Page appears. This Property Page is
mainly used for parameter setting of Scanning Area. Scanning Area refers
to the red frame in the Editing Area. The Scanning Area is mainly supply a
reference frame to scanning output method and image transformation. In
addition, the centre of the Scan Area is the centre of the Orientation
Frame too.
Every corresponding item in the above Attribute Page is
explained as follows:
1.Offset
X: the centre abscissa of the Scanning Area.
2.Offset
Y: the centre ordinate of the Scanning Area.
3.Size
X: the width of the Scanning Area.
4.Size
Y: the height of the Scanning Area.
5.Resolution:
It functions under scanning output method and picture transform occasion,
and the unit is dot/mm.
6.Interval:
It functions under scanning output method and picture transform occasion,
used for confirming the distance between scanning lines.
7.Outline:It
is a single choice button, and used for confirm the scanning area shape.
8.Scanning
Style: It is a single choice button, it functions under scanning output
method and picture transform occasion, it is used for confirming the
scanning method. Gravure: Gravure scanning output will mark the image
inside of the scanning area; Anastatic: Anastatic scanning output will
mark the image outside of the scanning area.
9.
Scanning Direction: It is a single choice button, it is used for
selecting horizontal direction or vertical direction.
When clicking Motor parameter layer on the top of
Property Frame, the following Property Page appears. This Property Page is
mainly used for parameter setting of motor and so on.
Every corresponding item in the above Attribute Page is
explained as follows:
1.
Motor Resolution(pulses/mm):It
defines the connection between motor pulse and the actual moving distance.
2.
Move low speed(mm/s):It
defines the start speed of motor when the laser is off.
3.
Move high speed(mm/s):It
defines the working speed of motor when the laser is off.
4.
Move acceleration(mm/s.s):It
defines the speed from start speed to high speed when the laser is off. If
the value is too low or moving distance is too small the motor will not
reach the high speed. If the value is too high the motor will not move
smoothly.
5.
Cut low speed(mm/s):It
defines the start speed in cut style.
6.
Cut acceleration(mm/s.s):It
defines the speed from start speed to working speed in cut style.
7.
Carve low speed(mm/s):It
defines the start speed in carve style.
8.
Push low speed(mm/s):It
defines the start speed in carve style when laser pen moves from one
scanning line to another scanning line.
9.
Push high speed(mm/s):It
defines the working speed in carve style when laser pen moves from one
scanning line to another scanning line.
10.
Push acceleration (mm/s.s):It
defines the acceleration in carve style when laser pen moves from one
scanning line to another scanning line.
11.
Carve optimize:Check
will define a quick carve style.
12.
Timer reset:It
will reset the timer.
F. Editing Area
Editing Area is an area where image can be produced,
modified and transformed in. The size of the out frame can be changed
through setting the parameter. But this out frame only function as
reference thing to the designed image, so the image can be gone beyond of
the out frame range.
To move horizontal and vertical roll on the Editing
Area edge in order to getting bigger field of vision, also could use
Increase Step-distance and Decrease Step-distance button on the Toolbar to
zoom in or zoom out the Editing Area too.
Among Editing Area the most important operation is
shirr operation. Shirr refers to a
broken line pane that has eight control dots. When click button on the
left side of Toolbar, an image will be produced and an Shirr will be produced along with it
either. At Editing Area have only one Shirr,
the Shirr and figure that it control have corresponding relations.
It is easy to realize the production, moving and
distortion of the Shirr through click,
drag, move and unclamp mouse, and transform the image which controlled by
the the Shirr consequently.
There are several kinds of methods to catch a certain
image:
1.To use mouse clicking the image directly.
2.Through clicking one listing item that represents
some figure in the List Box.
3.To drag the Shirr
and make it surround one or several images selected.
4.When choose several figures, could choose one image
first, then hold on Ctrl key, and click other figures at the same time.
G. Toolbar
There are two Toolbars: one is the Toolbar on the
topside and the other is the Toolbar on the left side. They are mainly
composed of each function button.
The Toolbar on the
topside, when placing the mouse cursor on each function button, a yellow
icon will appear to showing the name of the function button, and a explain
will appear at the Status Bar (at the button of screen) at the same time.
Now introduce each function button of Toolbar in
details from the left to the right.
1.New:Renew
the Editing Area, and clean already edited figures.
2.Open: Open file, input already edited file into
Editing Area.
3.Save:Save
file, save all edited images in the Editing Area to appointed file.
4.Cut:
Save selected images in the Editing Area to Cut Board, and clean all
chosen images at the same time.
5.Copy:Save
selected images in the Editing Area to Cut Board, and will not clean
chosen images.
6.Stick:Stick
the content in the Cut Board into Editing Area.
7.Mark: To start mark. Could use hot-key F1 to
replacing this operation, and could stop marking by ESC key.
8.Zoom in: Zoom in the field of vision of Editing Area.
9.Zoom out: Zoom out the field of vision of Editing
Area.
10.
Center:Center
the chosen image to the center of editing Area.
11.
Left and Right:Align
the chosen image from left or right.
12.
Up and down: Align the chosen image from up or down.
13.
X axle mirror image:To
mirror the selected image along X axle.
14.
Y axle mirror image:To
mirror the selected image along Y axle.
15.
Mode: To set the Output Mode of the image. Click button, a
Dialogue will spring. Output or Display Style has Clockwise Outline, Anti_clockwise Outline, Filling. Mode will output in carve style and
others will output in cut style.
16.
Filling Style: Horizontally or Vertically method & set the resolution of image and Scanning interval.
17.Expand
distance: to expand step distance of fine adjusting.
18.Narrow
distance: to reduce step distance of fine adjusting.
19. Font:Set
the font of editing characters.
20.Color:
to change the layer color of the selected image.
21.Scatter:
Break up a graphics as separation graphics.
22.Combine:Combine
separation graphics into one graphics.
23.Locate
Test: Click this button, the following screen image appears.
the above Property Frame has single Property Page, its
corresponding parameter function as follows:
1.Offset X:
The centre abscissa of the matrix.
2.Offset Y:
The centre ordinate of matrix.
3.Length: The width of matrix.
4.Width: The height of matrix.
5.Edge Size: The edge width of the matrix.
6.Edge Style: The edge type of matrix, there are three
kinds: Square, Round, Bevel.
7.Edge Radius: the radius of round angle rectangle or
the bevel length of bevel angle rectangle.
8.Rows: The number of rows when the image is arranged
with the array.
9.Columns: The number of columns when the image is
arranged with the array.
10. X-Space: The horizontal interval when the image is
arranged with the array.
11. Y-Space: The vertical interval when the image is
arranged with the array.
12. Constrain Proportion: When selecting this function,
the horizontal and vertical changes will be regulated automatically
according to the same proportion.
Other operation method of simple figures is in the
similar way, will not illustrate one by one.
A scene while clicking the
characters button in line_text, it produce two Attribute Pages in the
attribute frame. Page one is the whole Property of characters in line, its
each parameter is explained as follows:
1.Offset X: The horizontal deviation of whole image.
2.Offset Y:The
vertical deviation of whole image.
3.Length: The length of outline of whole characters.
4.Width: The width of outline of whole characters.
5.Size X: The width of single character.
6.Size Y: The length of single character.
7.Word Space: The interval distance between characters.
8.Angle: The whole inclination angle of characters.
9.Test Space: The interval between many rows of
characters.
10.
Serial interval: When check Serial text, it defines the interval
between Serial num.
11.Text:
Can input characters in this editing frame, after characters?inputting
are finished, must click the lock button to lock for becoming effect.
12. Rows: It is the number of rows when images are
arranged into array.
13. Columns: It is the number of columns when images
are arranged into array.
14.X-space:It
is the horizontal distance when images are arranged into array.
15.Y-space:
It is the vertical distance when images are arranged into array.
16.Word
Arrange: Choose horizontal or vertical method to arrange the character.
17.Text
Aligned Style: there are four method: Left/Up, Right/Down, Center, Two
Sizes.
When
clicking the Single Word Property item, the above Property page appears.
This Property page is used for control the shape of single character.
To
change Size X, Size Y, Offset X, Offset Y, Angle, Font Width_X, Font
Width_Y, etc through clicking the character in the list frame on the left
side and then revising the parameter on the right side.
The Text Width_X and Text Width_Y at the lower part
mean the parameter of adding thick to whole characters.
Notes:
Parameters in this attribute page are all the relative quantity to the
whole characters, so it could be positive number or negative number.
The design of Arc_text is similar to the above
introduction, will not repeat to illustrate again.
While clicking BMP button, will spring a
FileDialogue.
This software can dispose black-and-white or
multi-grey level BMP picture.
Outline Convert: Produce corresponding VCT outline file
of this picture through this button (aim for black-and-white BMP picture).
There are the following parameters showing in the
Property frame:
1.Brightness: It can adjust the brightness of
multi-grey level image.
2.Contrast: It can adjust the contrast of multi-grey
level image.
3.Gate: It can adjust the Threshold of output value of
multi-gray level image.
4.Resolution Property: Refers to the combination method
of BMP image and background. There are two Property: Normal and Native.
5.This software offers Module, Dither and Threshold
three ways to mark multi-gray level image.
When
click and choose suitable PLT file, the following picture appears:
The
little difference between editing BMP file and PLT file is: PLT file can
divide into different layer, & change the layer color through
setting the color option in Property Page.
|